A Home Assistant HACS addon which can track multiple countdowns to important dates.
Install
- Follow the HACS guide adding a custom repo.
- Add this repo
https://github.com/mrvautin/hacs_countdown_tracker - Go to
Settings > Devices & services - Click
ADD INTEGRATION - Enter
Countdown Trackerand pick the matching integration - Enter the
Nameof the date you want to track - Eg:Wedding Anniversary - Enter the
Due dateof the date - Format:YYYY-MM-DD - When happy, select
SUBMITto create the tracker
You will now have a sensor created to track your date - sensor.countdown_<name>
Adding new events
Adding new events is easy.
- Go to
Settings > Devices & services - Select
Countdown Tracker - Click
ADD HUB - Fill in the form as per above and click
SUBMIT
Removing events
Removing events is easy.
- Go to
Settings > Devices & services - Select
Countdown Tracker - Find the event to remove
- Click the 3 dots on the right of the event
- Click
Deleteand confirm
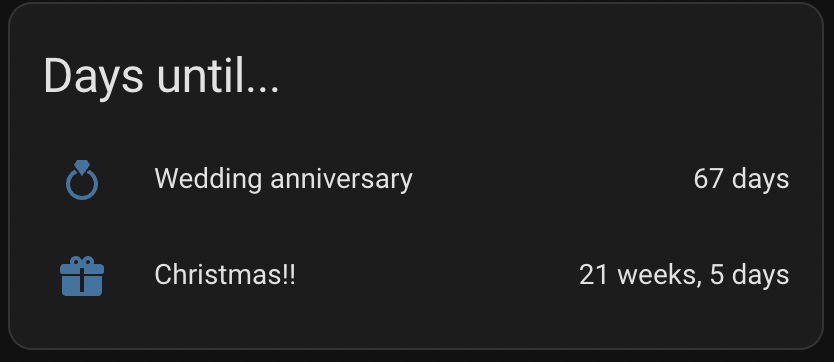
Card display
You can then add this to a card. Yaml for your card could look like this:
type: entities
title: Countdowns!
entities:
  - type: attribute
    entity: sensor.countdown_wedding_anniversary
    attribute: countdown_days
    name: Wedding Anniverary
    icon: mdi:ring
  - type: attribute
    entity: sensor.countdown_christmas
    attribute: countdown_human
    name: Christmas!!
    icon: mdi:gift
The attribute of countdown_days will display x days until the due date. You will notice in the sensor you have a few attribute options:
countdown_dayswill displayx daysuntil the eventcountdown_humanwill display in months/weeks/days until the even - Eg:3 weeks, 6 daysdue_dateSimply the date of the event